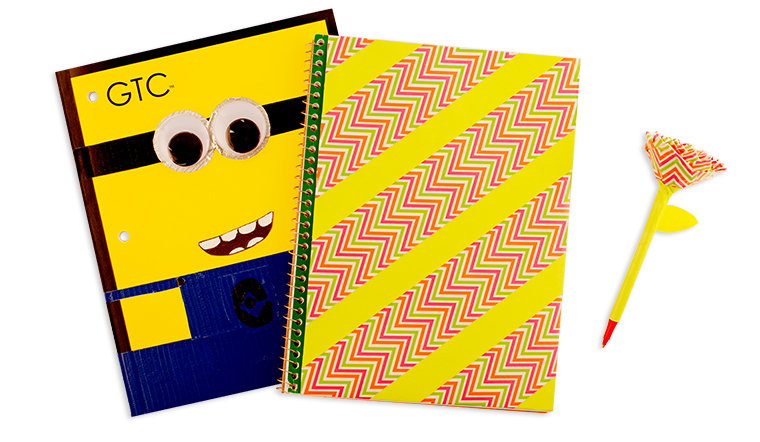
design your notebooks
Just step inside your local H-E-B this time of year and the aisles are filled with familiar faces: Doc McStuffins, Hello Kitty, and all the superheroes imaginable. While star-studded notebooks, backpacks, and lunchboxes are on most kid’s lists year after year, buying notebooks one-by-one can add up. Plus, sometimes it can be hard for kids to distinguish which notebook is for which subject when they’re in a hurry. There’s nothing worse than the dreaded feeling of your kiddo bringing home a math binder when they really needed history instead.
Making your own notebooks is a fun, creative, and cost-effective way to show your student’s individual flair. Just think! Buy a pack of spiral notebooks and with a little DIY-time, you’ll not only save big, but you’ll also have unique designs tailored to your kiddo and their personality. Plus, if you get the whole family involved, it can be a fun tradition for everyone to pitch in and get in the back-to-school spirit.
We’ve put together a few no-fail ways to make your notebooks look great and last all year long! Best yet? The same tricks you’ll find below can be replicated to make interesting book covers and folders as well!
What You’ll Need:
- A spiral or spiral-less notebook
- Patterned and single-color duct tape
- Scissors
- A Ruler
- Permanent markers or paint pens
- Single hole punch
How You’ll Do It:
- Lay your notebook onto a flat surface like a countertop or table, making sure to keep the cover separated from the rest of the pages (you don’t want tape to get stuck to any of the pages and accidentally tear them).
- Select which duct tape you want to use. You can either choose one pattern to make your notebook have a cohesive look or pair a print with a bright solid color to create your own design.
- If you opt to only use one pattern on your notebook, the easiest way to cover your notebooks is to cut 12-inch strips of duct-tape. Begin at the left, adhering the tape one millimeter away from the spiral (you want as much of the notebook covered in tape as possible). As you work to the right, adhering the tape with just a millimeter of overlap, you’ll want to make sure that there are no gaps where the binder’s cover can show through. The strips are 1/2-inch long on each side so they will fold over to the inside of the notebook.
- If you choose to use multiple patterns or a pattern and a color together, it’s time to get creative! Not only do you get to think about all the different pairings of tape like animal print, plaid, and neon — oh my! — you also get to consider how to adhere the tape to the cover of the book in different ways. See a few of our favorite design options below.
- When you’re cutting the tape, remember that you’ll want to measure it about an inch longer than it actually needs to be. The tape should fold over the sides of the notebook to make sure that it stays in place and lasts all year long.
- Once the whole notebook is covered, the real design challenge begins. There are tons of ways to personalize each notebook or label it in a creative way. Think about using paint pens or doing a bit of bedazzling to really make the notebook stand out!
- For a final touch, make sure to punch three holes where they already exist so that your notebook can easily fit into a three-ring binder.
- After you’ve created your masterpiece, you’re on to the next! Don’t forget to make notebooks different enough that your kiddos can tell them apart in a cinch!
- Remember! If you’re creating a book cover using the same instructions, you’ll want to craft the book cover first (using an oversized sheet of paper or brown paper bag) and put the tape on that rather than the book itself!
Design Options:
- Alternate pattern and solid diagonal strips, starting at the center.
- Weave the patterned and solid pieces of tape together to create a basket-weave effect
- Layer two pieces of colored tape to create a thick stripe, and follow it by a thin piece of a patterned tape
- Make the entire notebook a solid color and then create a monogram in the center with printed tape (or vice-versa!)
- Start a diamond at the center of the book and build it out to the sides, alternating colors and patterns until you reach the edges of the notebook.
- Pick up four green notebooks and use a single strip of blue, red, purple, and orange tape at the top on the four different covers. Adhere some big googly eyes and you’ve got the whole Ninja Turtle gang!


