 |
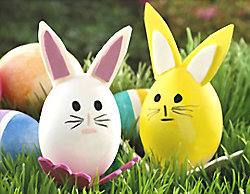
If there is anything more symbolic to Easter than decorated eggs, it's the mythical rabbit that delivers them. Using products found at H-E-B you can get the whole family involved in making these decorative Easter egg bunnies. With their long rabbit ears and bushy tails, about the only thing your bunnies won't do is hop. Here's everything you'll need.
|
Materials Found At Your H‑E‑B
|
|
-
Yellow art foam
-
Cotton balls (1 per egg)
-
Elmer's glue
|
How To Make It
1. Boil the eggs and let cool.
2. Dye eggs and 1 cotton ball (per egg) yellow, or any other bright color you choose and let dry.
3. Cut 2 rabbit ears out of yellow art foam, about half the length of the egg or longer. They can be any bright color or you can keep them the same as the color of the egg's dye.
4. Cut 2 smaller inner ear shapes out of white art foam and glue them in the middle of your bigger ear shape.
5. Glue ears to the back of the small end of your colored egg, placing them in a "V" shape with the pointier side up and inner ears facing forward. Hold until dry.
6. With a black marker, draw a face on your egg bunny on the opposite side you glued on the ears. Don't forget the whiskers!
7. Glue the dyed cotton ball on the back of the bunny in the appropriate spot for a bushy bunny tail—below the back of the ears.
8. Place your Easter Egg Bunny near other decorated eggs as a rightful guardian.
Tips
|
